This is what it looks like now but there's a lot of work in getting it to this point.

Now lets get to it.
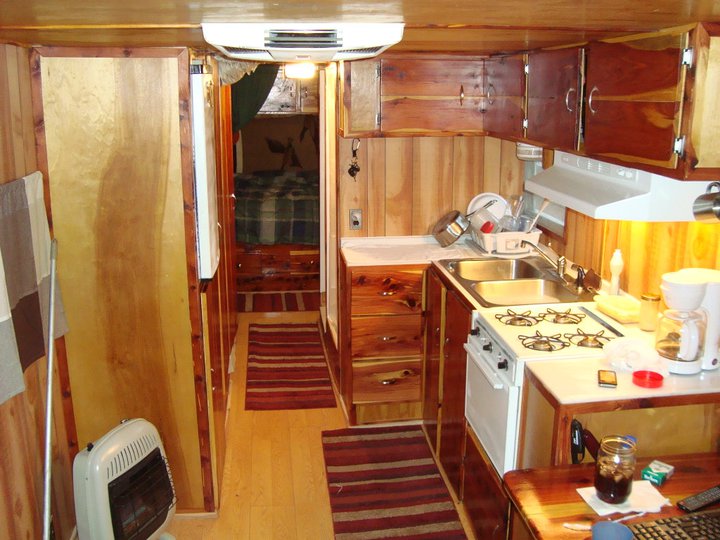
We found a nice piece of property located out in the country at a reasonable price so we cleaned it up, moved our camper onto it and began work. First a look inside the camper. I remodeled it with cedar and will be doing the same with the cabin. The cedar has a very nice calming effect I think. We call the camper "The Squirrels Nest" And will be calling the cabin "The Cedar Palace" name sake for this blog. This entire cabin project is being built "out of pocket". We are doing it as we can afford it and it will be paid for when completed.


We started this project in the July South Carolina heat. I mowed and cut and mowed and cut and burned trash and old stuff until I got it clean enough to get started. I won't go into all the bureaucratic hoops I had to jump through but they were many just to get the power cut on to a saw pole. It was very frustrating but that's in the past so lets move on.
After doing some Internet research we decided to get our plans from http://www.townandcountryplans.com/ they have some very nice tiny cabin plans that I have learned are very well thought out. Meaning there is very little scrap or waste and everything "breaks" very well using 16" centers. They also are suitable for submission to your local zoning board. We got "The North Bay" plans. After making just a couple of revisions (adding a window, moving 2 doors and making a window into a door and drawing a plan for a monolithic slab. Not using the crawl space plan.) We were set to go. We rented a "terramite" tractor/backhoe from our local rental shop and dug the footers for the cabin.

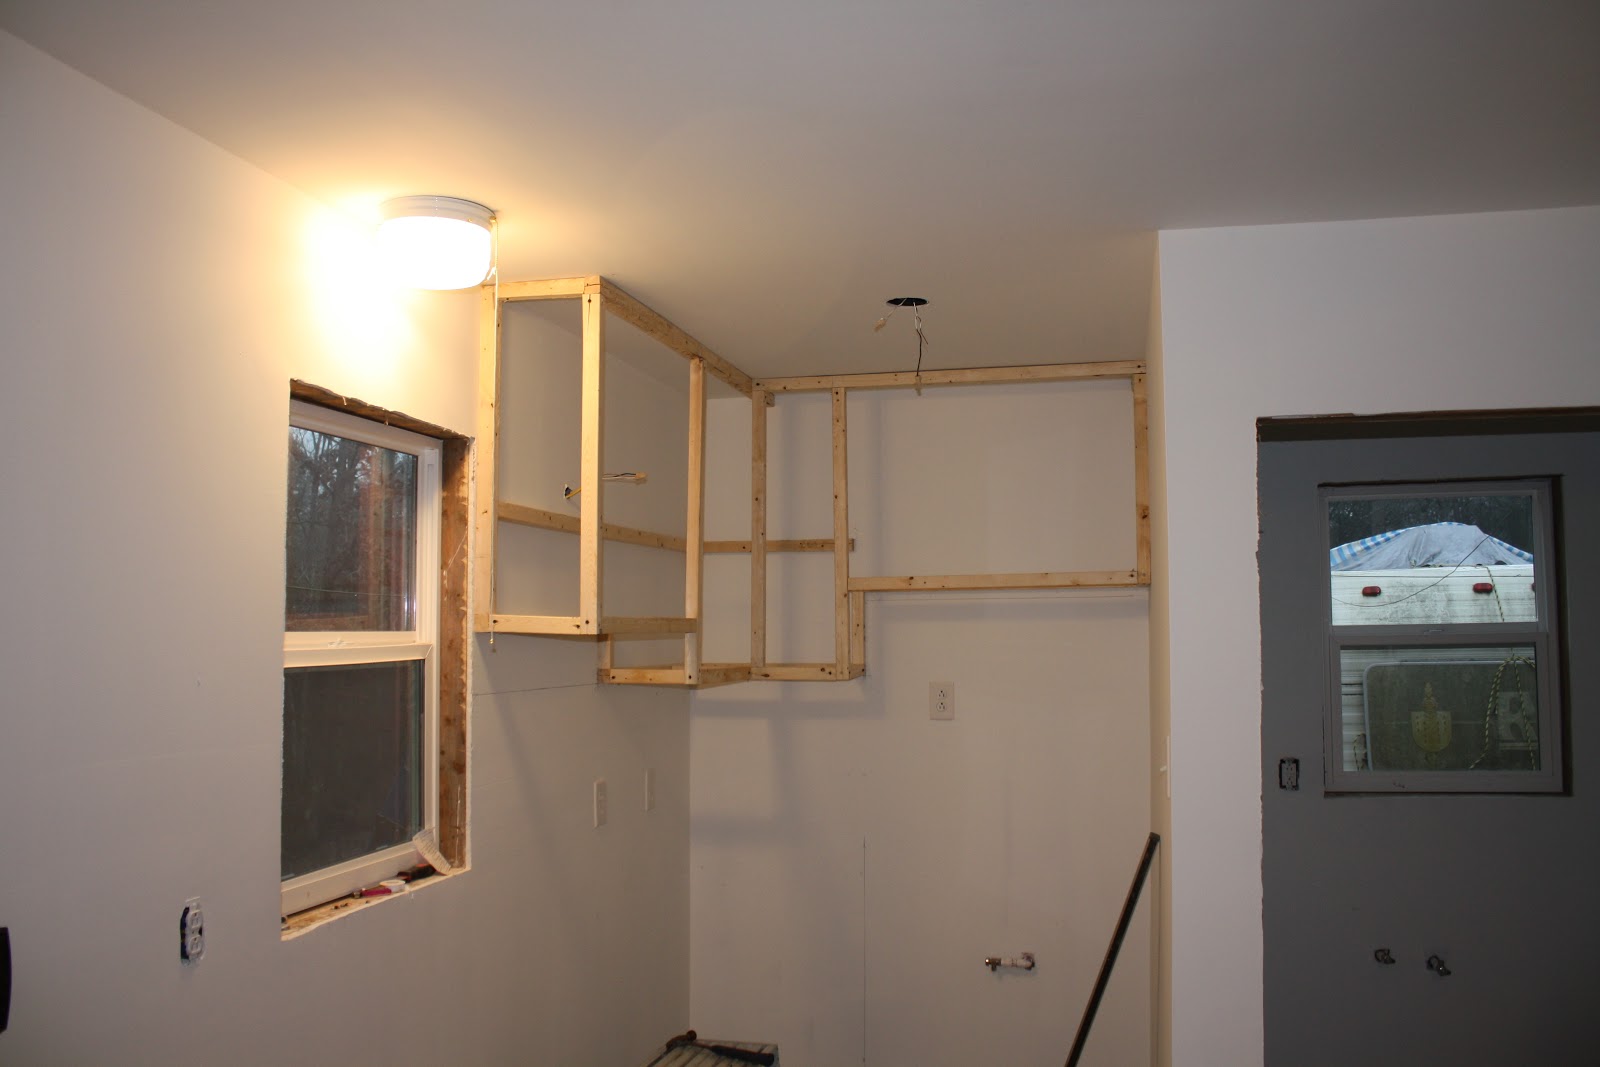
The overall size of the cabin is 14 ft wide by 30 ft long. It will have a 6 ft wide by 20 ft long porch off of the front side (which we decided to face into the woods for reasons I will reveal a little later). After digging the footer for the slab which has a 12x12 turn down all the way around it we formed it and installed all the necessary pipes. Not much plumbing involved. The closest pipe is for the shower the next closest one if for the toilet then the bathroom sink and finally the kitchen sink. We are going to put the water lines in an insulated raceway on the exterior wall, we didn't want them in the concrete. By being in an accessible raceway any repair will be simplified greatly. The wire and plastic are required by code and actually make for a better built slab.


Once we get to this point it's time for a county inspection then we can get power and call the concrete truck. Now this is a 4" slab with the turn down that I mentioned. There is minimal over dig and everything is level and it took 10 yards of concrete. After the pour there was a little waste left. We dumped it in a wash in the driveway. I think I should mention that this is the only point at which I got help. A friend of mine helped me work out the concrete but after that it's been all me. Now we have a nice level slab to begin our cabin.


The pipe you see on the other end is for the vent pipe from the drain lines. It will extend above the roof line when finished. The shed was on the property when we purchased the property.
Now that we have the slab poured we waited a month for it to cure so we could begin with the walls and anchor them as we worked. During this time we set up my camper and all the other stuff we had to do. We had to run water lines and power. There was always cleaning up to be done so we were plenty busy. We set up our washing machine and our bladder tank for the pump in the shed. We use a clothes line for drying the clothes. We actually live quite comfortably in the 240 sq ft of my camper so the 420 sq ft of the cabin when finished will be our version of the "McMansion"!


I am using 1/2" X 6" drive in wedge anchors to anchor the walls to the slab. Our code in South Carolina requires that they be no more than 12" inches from the corners and that they be no more than 6 ft apart. Seems reasonable to me. Now standing the walls alone was a bit tricky but I managed. They actually went pretty quick. I managed to build my way through $600 worth of material in just 3 days.


I should mention that I am hand nailing all of the walls actually I am hand nailing everything. I'm not using a nail gun on any of it simply because I don't have one nor do I need one.


Once I have the walls stood it is time for the ceiling joist. It is now that I want to say, please be safe if you undertake a project like this and make sure your tools are appropriate for the job. I thought mine were but I was wrong. I was working off of my scaffold and using a 6' ladder, you know the aluminum type. Well I stepped from my scaffold to my ladder to check to make sure the very first ceiling joist was breaking right and the ladder tipped and swept my feet from under me and I fell 8' onto my shoulder and dislocated it. When I raised myself up it popped back into joint and that is when it really hurt. It made a big impact on my ability to do the work for a couple of months but I'm back in shape now. So please! BE CAREFUL!
Now back to the project.
The ceiling joist were pretty easy once I got started. Pretty much straight forward. 14' long 2x6 with one corner mitered so they fit below the roof sheeting.


Sun setting on another days work. It's starting to take shape for sure now.

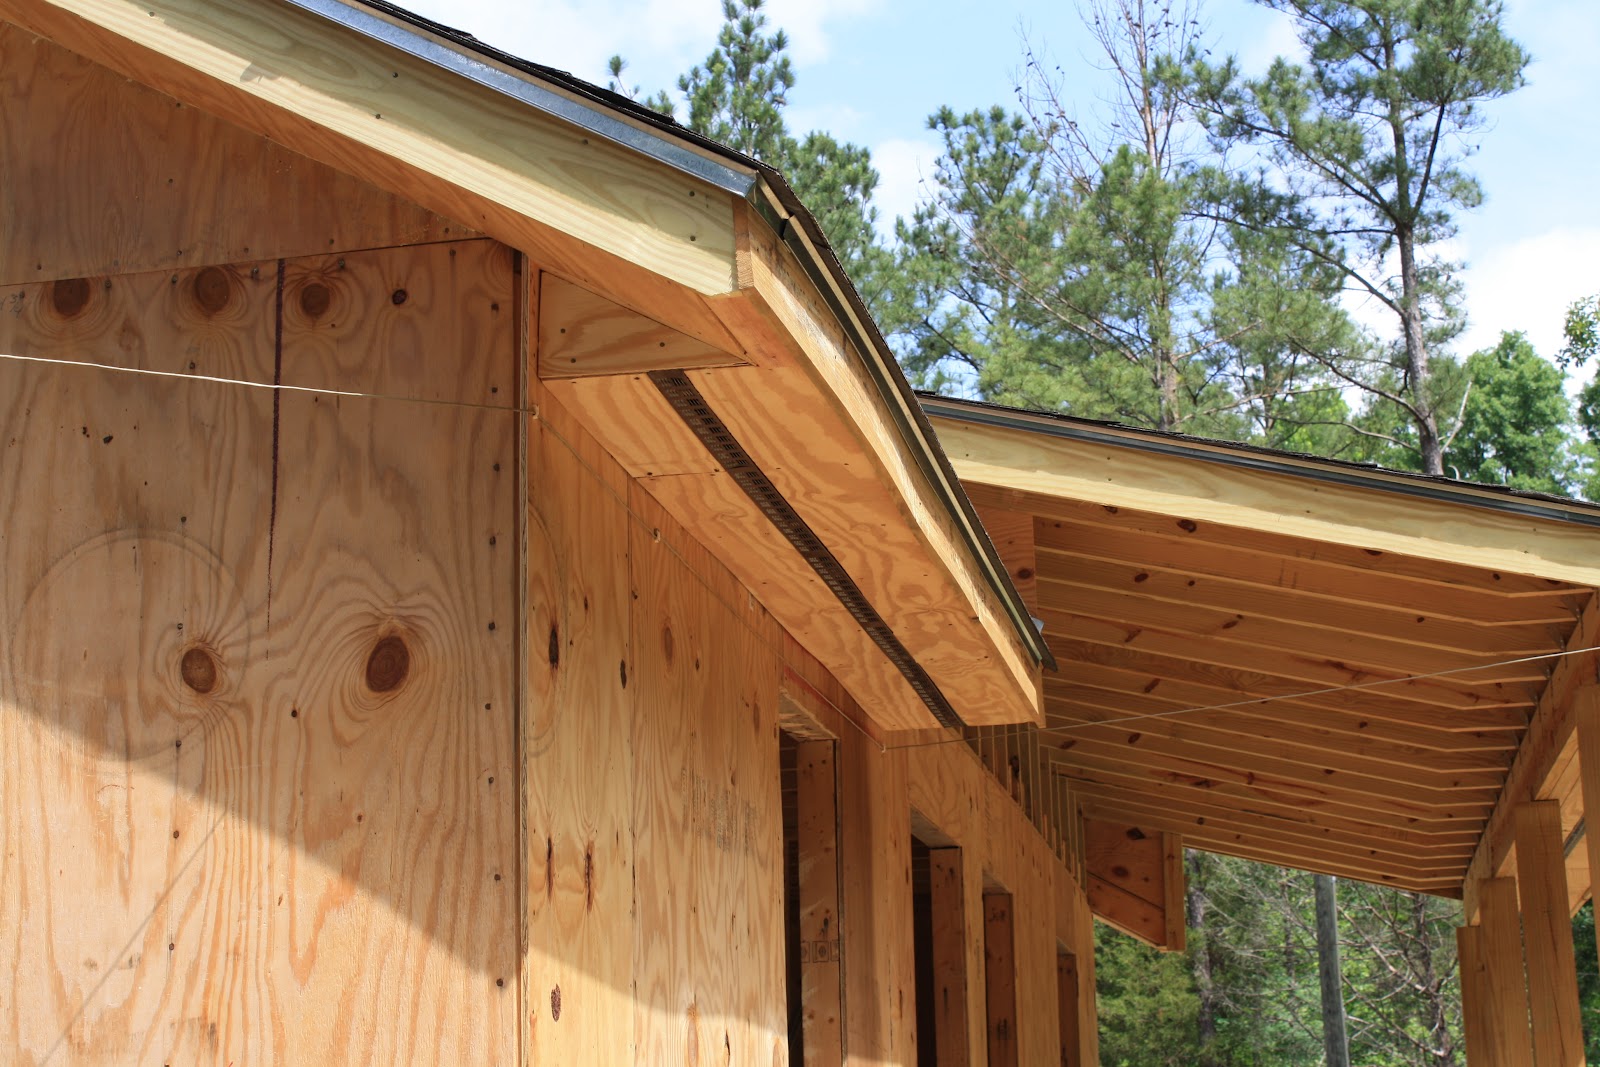
Now it's time to get to work on the rafters and ridge beam. This was a little tricky. The ridge beam is a 2x8 and it needed to be 32 ft long. In order to do this by myself I would have to do a little preparation before I could set the ridge. I built a support on each end and two in the middle of the house. I ran a 2x6 "rat seal" down the center of the cabin and built the supports on the rat seal. The supports were built tall enough that once I placed the ridge beam on top of them the top of the ridge would be to the height I needed to get the roof pitch I wanted. The pitch of the roof is a 7/12. That is 7 inches of rise for every 12 inches of length. You can see the support in the picture below.

Once I had the ridge in place I started placing rafters in randomly just to support the length of the ridge and to make sure it stayed as straight as possible so my rafters would be a uniform length.

You can see one of the 4 supports a lot better in this photo.

.One of the hardest parts about doing the rafters was all the climbing up and down. I would measure a few then climb down and cut them and then climb back up and nail them into place but the finished product is well worth the effort.


This picture shows the "false rafter" off the end of the cabin. It is just for the overhang and will be used for the boxing. It will hold the corner flood lights and both ends will be the same. It isn't finished in this photo there will be 3 2x4s on both sides that will be 4 ft long that will be notched into the first 3 rafters that will tie it to the roof.

Now with the rafters for the main structure finished it is time for the sheeting on the roof. This is another labor intensive job by yourself but as with the others. Just get in there and get it done. A note here. If you have noticed in a couple of the pictures you see some scaffold bucks. Well they are worth their weight in gold I tell you. I bought them new several years back for a project rebuilding the boxing on a house and they have paid for themselves several times over. A well spent $500 dollars I must admit.
The roof sheeting I would just lean it against the cabin and then get on the scaffolding and then pick up the sheeting and lay it on the roof. Working my way up the roof from the bottom edge.

Once I got to the peak I made sure to cut the sheeting about 1 & 1/4" short of the ridge beam all the way down the ridge beam except for the last 2 ft of the ridge on both ends. That I ran the sheeting all the way to the top. I cut it short for the ridge vent that goes on after the shingles. It is just easier to do that than it is to drag the skill saw onto the roof an cut it out later.When I finished the sheeting I decided not to use asphalt roofing paper to underlay the shingles. Instead I used paper called "tri-flex". It is kind of a more fiberglass paper made by Grace. It doesn't rip but is easy to work with and seems to be much better than asphalt paper. It cost more ( $100 dollars a roll and 1 roll was all I needed) but it was well worth it to me.


If you noticed, I am also sheeting the side of the cabin as I go. I usually do that when my money is kind of low. I try to keep something to do all the days that I am off work. I think now would be a good time to show why we turned the front of the cabin towards the woods. Once we finish we didn't want to be sitting on the front porch of our lovely cabin staring off down the drive way, SO! We turned it towards the woods for a more pleasant view. To start with it didn't look like much of a view but on those days when money had to be spent on other things I slowly worked on the "view".


Have you every had the feeling you were being watched. Well I have had that feeling so much that now I just acknowledge the "watchers" and keep on working.


Now that I have the post set and leveled it's time to place the header and start with the rafters. The header is a double 2x10 and is 20" long. It wasn't to difficult to place. I just did it in pieces. Just remember to stagger your breaks on each piece of the header and make sure that the break lands on the top of a post. I then used 8" metal straps to secure it to the post on one side and I used 2" metal L-brackets to secure it on the
back side.
Once I had the header set it was time to do the rafters. The rafters are one of the revisions that I made to the plans. The plans had the rafters for the porch set at 24" centers. I decided to set them at 16" centers. It didn't cost much more to do it that way and it makes for a sturdier porch roof. I also used hurricane straps to attach the rafters to the header. By the time I got all that done it was a long day but I decided to take pictures even though it was dark.


After some much needed rest I pressed on with the porch roof in the light of day. It was important that I not let it remain without the roof finished for to long. It is winter now and I am very aware of the amount of water everything is being exposed to. A full dry in is still further down the road but the roof MUST be finished as soon as possible.
The roof for the porch was pretty easy actually. Again I would just lean the sheeting against the scaffolding and then climb up on the scaffolding and pick the sheeting up and lay it on the roof. I measured from the high end of the porch rafters down towards the low end 12ft and popped a line. I then measured from that line to the low edge, added the right overhang and then cut a strip of sheeting that wide and installed it along the edge. I did that so that the small sheeting cut would be along the lower edge instead of in the valley where the two roofs meet.

After placing the cut piece down the edge it was then just a matter of using whole sheets the rest of the way up. Also if you look closely where the two roofs meet you will see three 1"X6" nailers that are ran along that point to give you a solid place to nail the rafters to.


Now that the porch roof is sheeted I can finish putting down the shingle underlay. Like I mentioned before I used a product called Tri-Flex that I liked a lot. Well I ran short so I ended up having to finish some of the porch with regular asphalt paper I had on hand. I didn't want to spend another $100 on a roll of underlay that I would only use a small piece of.


While I am up on the roof I want to show you how the view is developing. Like I have mentioned, when money is unavailable I do what I call "poor man work" meaning it only cost sweat and effort to get it done. I also needed to harvest the cedar trees that I was going to use for my cabinetry and the other furniture I was going to build for the cabin. You can see some of the cedar trees in the photos below. I will explain how I got them over that 8' deep ditch a little later.


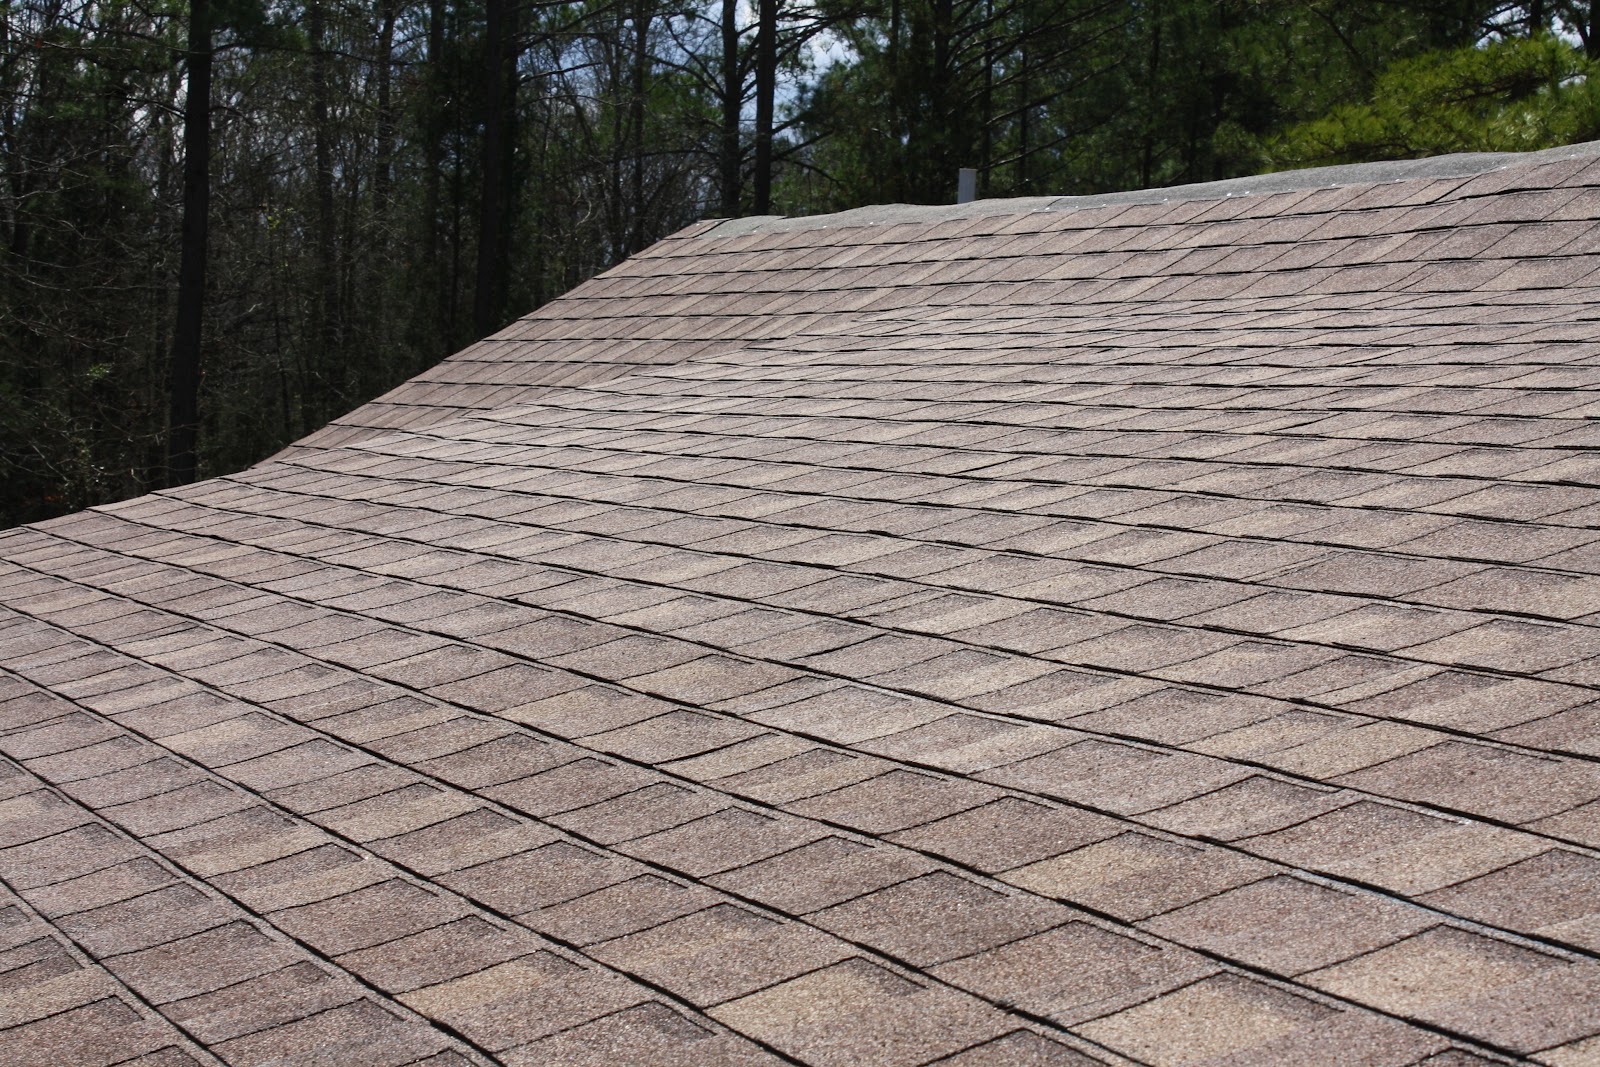
Now that I have the roof sheeted and papered it is time to do the shingles. This is the point I have been working hard to get to. I wanted to get the shingles on to keep the rains from ruining everything inside and so I have them finished before summer. The summers in South Carolina are very hot and shingling during that kind of heat is best avoided if possible. Not just for all the obvious reasons. Walking on your shingles in the heat can mess them up and they are not cheap. I decided to use architect shingles because they last longer and they gave me the look I wanted. The style we chose is called "Resawn Shake" I really liked the way they looked. I had considered a green color but as soon as I saw the resawn shake I knew that was the style for the cabin. I have run shingles before but not architect shingles. They are actually pretty easy to run. The shingles have the lines pre marked on them and clear directions on the wrapping. They sell what are called “starter shingles” those cost $40 a bundle, BUT you can use 3 tab shingles as starters all you have to do is turn them upside down. They cost $22 a bundle so that’s what I used and they work just as well.

I chose a color for the 3 tab starter shingle that was close to the resawn shake so I could use them as the "cap" also. More on that shortly. I popped my first line along the edge of the roof at 11" up from the edge of the metal drip edge. That gave me a 1" over hang on the shingles. I also popped a line up the end 11" from the edge of the metal drip edge which gave me an 1" over hang on the ends. Then you lay your first shingle "upside down" along that line down the edge and you turn the one that runs up the end with the "tabs" turned into the roof. Now you are ready to run your architect shingles. The way I ran them that you see above and below is called "diagonal" or "stair stepping". You lay you first row directly on top of you starter shingle. Even at the bottom. The architect shingle is wider than the starter so it will completely cover the starter shingle.
Note: Make your cuts with the shingle turned over backside facing up and with the part to be exposed on the down hill. Cut from the right edge. That way when you turn the shingle over to lay it the cut has been made on the shingles left end. That will put you cuts all on the outer edge and give you the factory edge to butt the next shingle in the row to. This will help you keep them straight as you work your way up the roof. I also used a scrap piece of plywood about 8" wide and about the width of the shingle as a "cutting" board. That way I didn't make a cut in the shingles I had already ran by mistake.
Your 1st row will begin with a whole shingle.
The 2nd row you cut 6" off of the left edge of the shingle and lay the larger piece.
The 3rd row you cut 11" off of the left edge of the shingle and lay the larger piece.
The 4th row you lay the 11" piece you cut off previously and the 5th row you lay the 6" piece you cut off previously.
Now you drop back to the bottom and run whole shingles up to where you are and you repeat the process all the way up the end until you are at the top.


Now to cover the whole cabin it took 8 square of shingles. That includes all the starter shingles for the edge and the ends and all the shingles for the cap. It takes 3 bundles of shingles to make a square. One square (3 bundles) was 3 tab shingles. They cost $22 a bundle, the rest were architect shingles (21 bundles) and they cost $26 dollars a bundle for a grand total of $612 to finish the shingles. The ridge vent is not included in that but the shingles to cover it are included. This process took me a couple months because of the cost but I finally got it done.
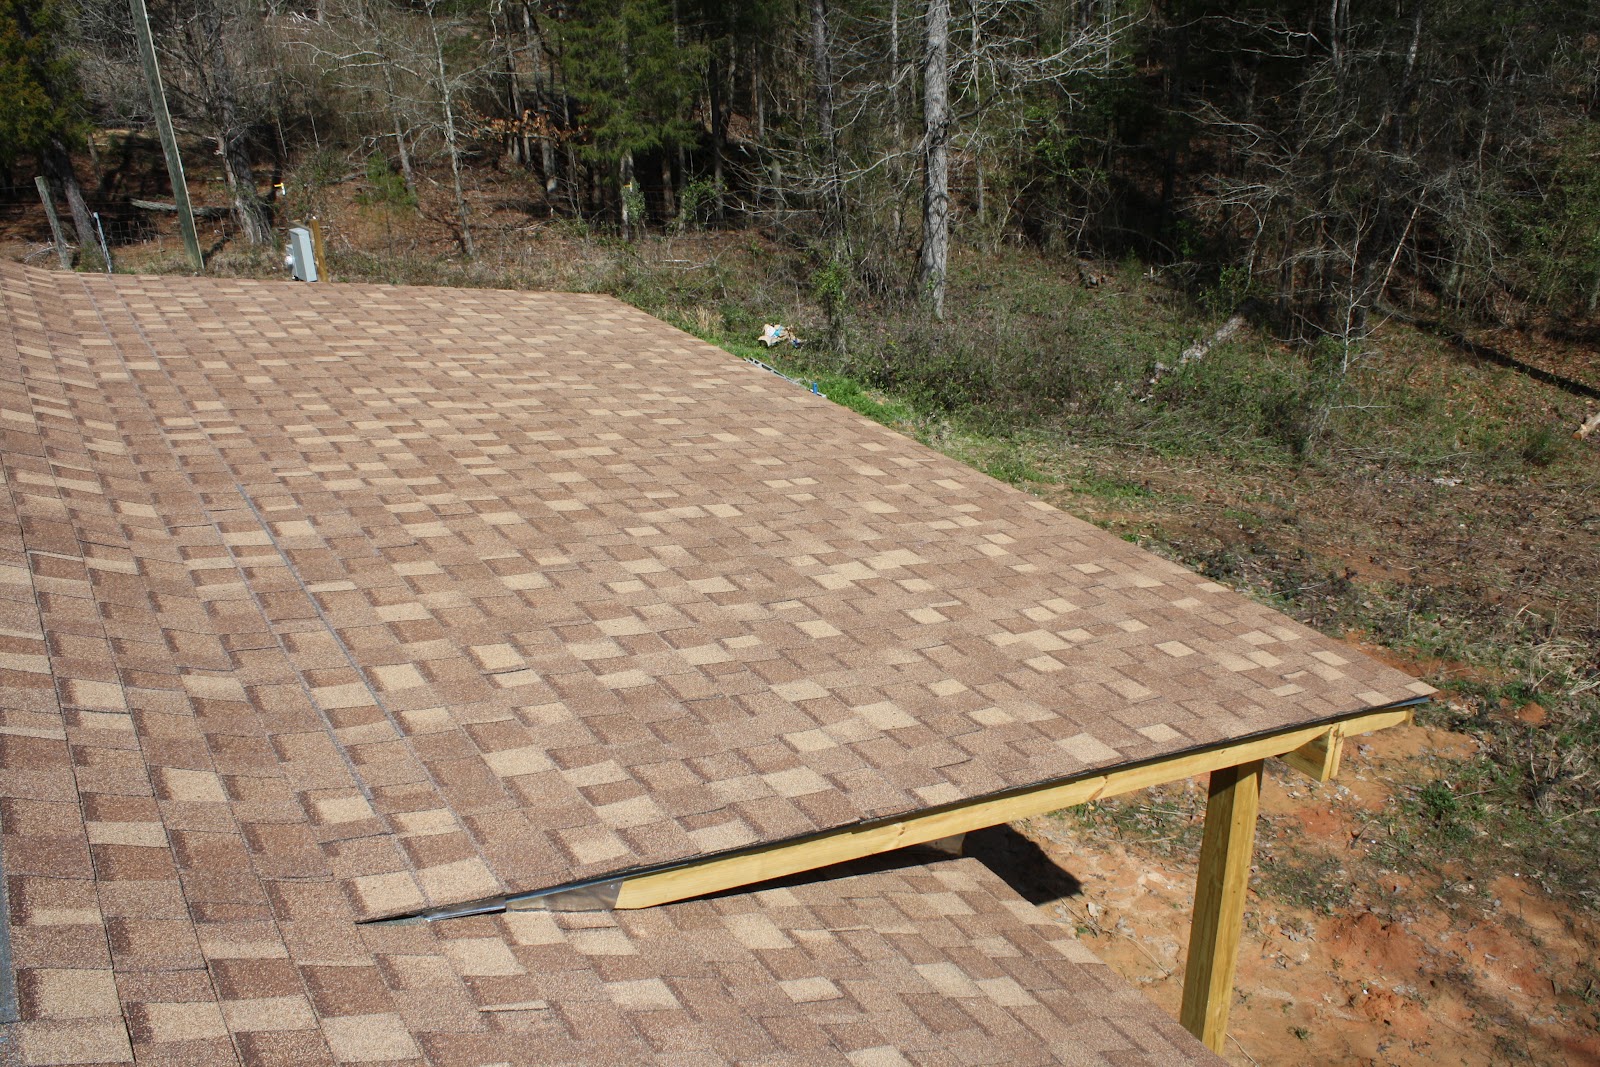
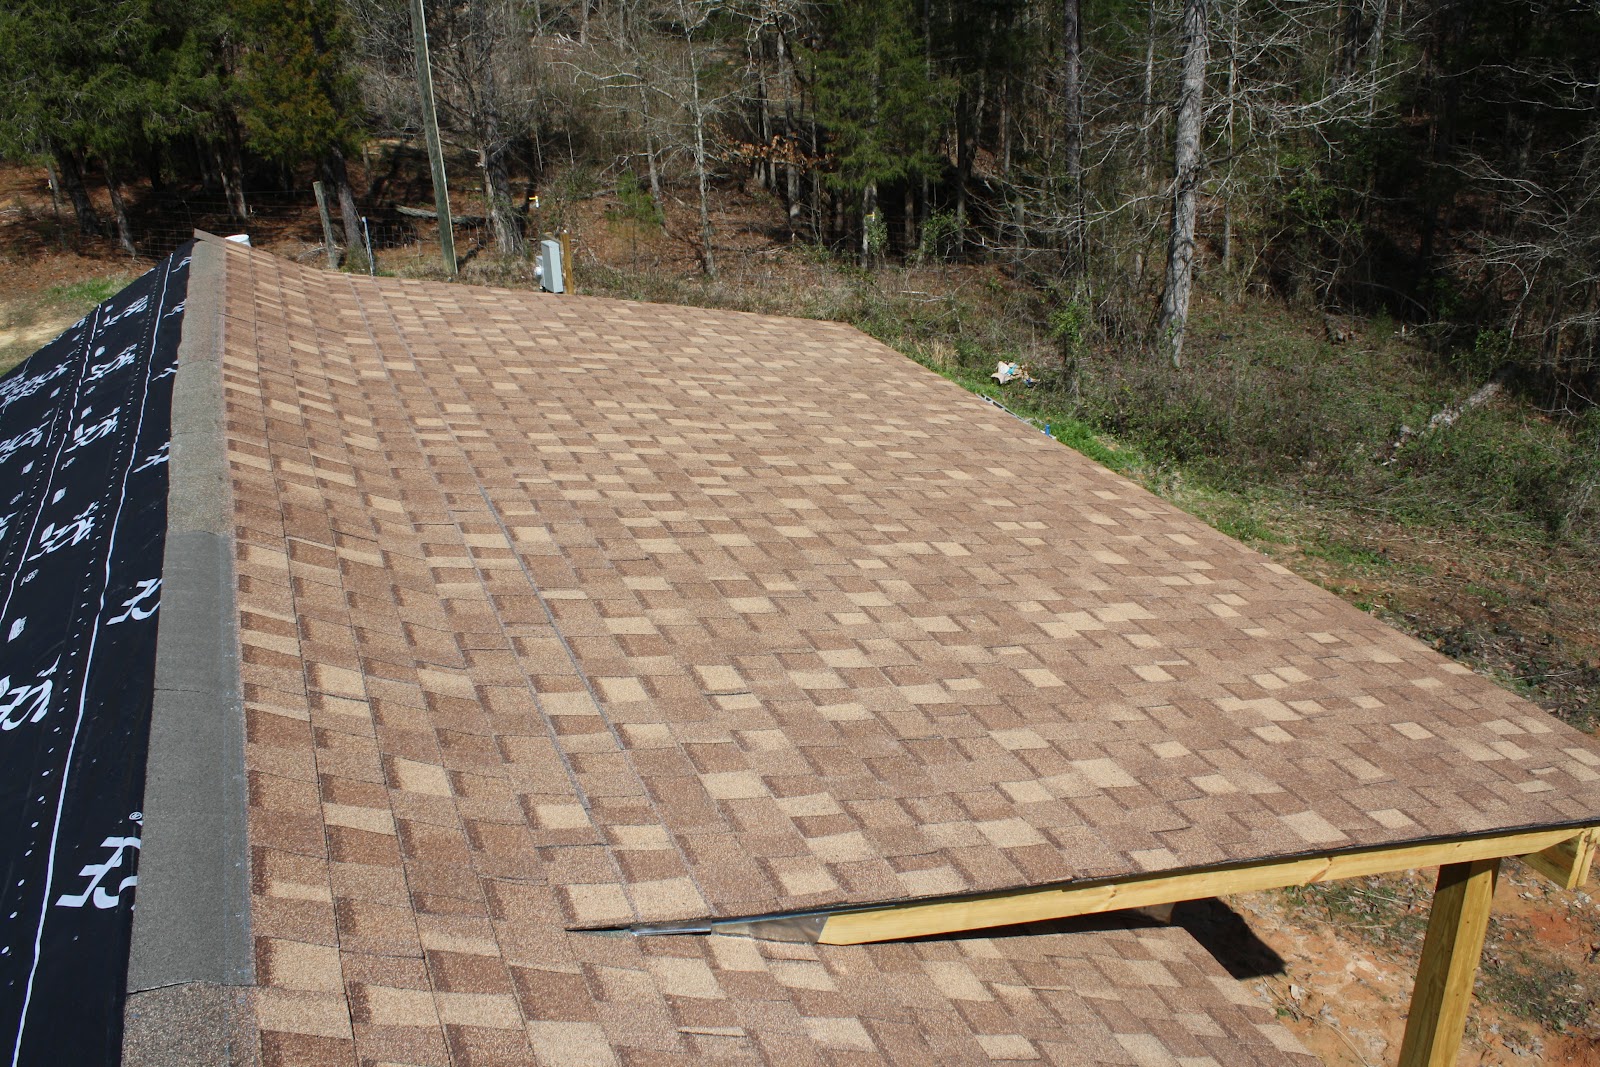


After finishing the shingles on the front of the cabin I moved to the back side and continued the process.


Once I had finished the shingles on both sides it was time to install the ridge vent. That was pretty easy, just cut out the shingles along the ridge. Then lay the vent and nail down the "cap" shingles.


With the roof now finished I feel much better. I am able to keep the rains out and now I no longer have to be on the roof. It's a good thing to, summer is beginning and it will soon be to hot for that kind of work.
I think I will take time to explain how I got the trees I cut down to build my cabinets out of across that ditch.
I used my old Jeep truck and a snatch block to drag them across the ditch and then out to a place where I could load them and take them to the saw mill.
I think I will take time to explain how I got the trees I cut down to build my cabinets out of across that ditch.
I used my old Jeep truck and a snatch block to drag them across the ditch and then out to a place where I could load them and take them to the saw mill.


This is what all the effort was for. What I see in these pictures is kitchen cabinets, a four poster bed with the drawers under it, a coffee table with end tables and a whole lot more. What do you see? More on this later.


And finally, the work horses that made it possible.

Now back to the construction. After finishing the roof I thought I would go ahead and finish the exterior sheeting and also finish the boxing. The sheeting was easy. When I started on the boxing the first thing I needed to do was put in my 2x4 blocks or "lookouts". They averaged out the same length so it was a matter of cutting them and nailing them in place. Doing this much work overhead will surely test the upper body so be prepared.


Now it's a matter of finishing all of it possible while I have the scaffold set up. That means first running the vent all the way down the center and then running the plywood down each side of the vent. I also ran the facesha board as I went. I started on the backside and worked my way to the front. It took a couple of days but I finally have it finished to the point now all I have to do is come along and silicone the cracks.


I fell a couple of boards short of finished all the way around but the major work is done. Just two facesha boards left to run then finished.


Now that the boxing is finished I think I'll move on to the porch next. For the porch I decided to mix and pour the concrete by hand. For just a little more than having the concrete truck come I could buy a concrete mixer and the concrete, mix it myself and have a mixer of my own once I was finished with the porch. Due to the amount of work I decided to pour the porch in sections.


The two end sections were approximately 6.5 feet by 7.5 feet. It took 50 #80 bags to pour the two end sections. With a little trial and error I worked out a mix of 2 gals. of water to 2 #80 bags of cement. That seemed to give me a wet enough mix to give me time to mix it all and still be able to work it once I was done mixing. I also put in concrete wire to help prevent cracking once the concrete had set.

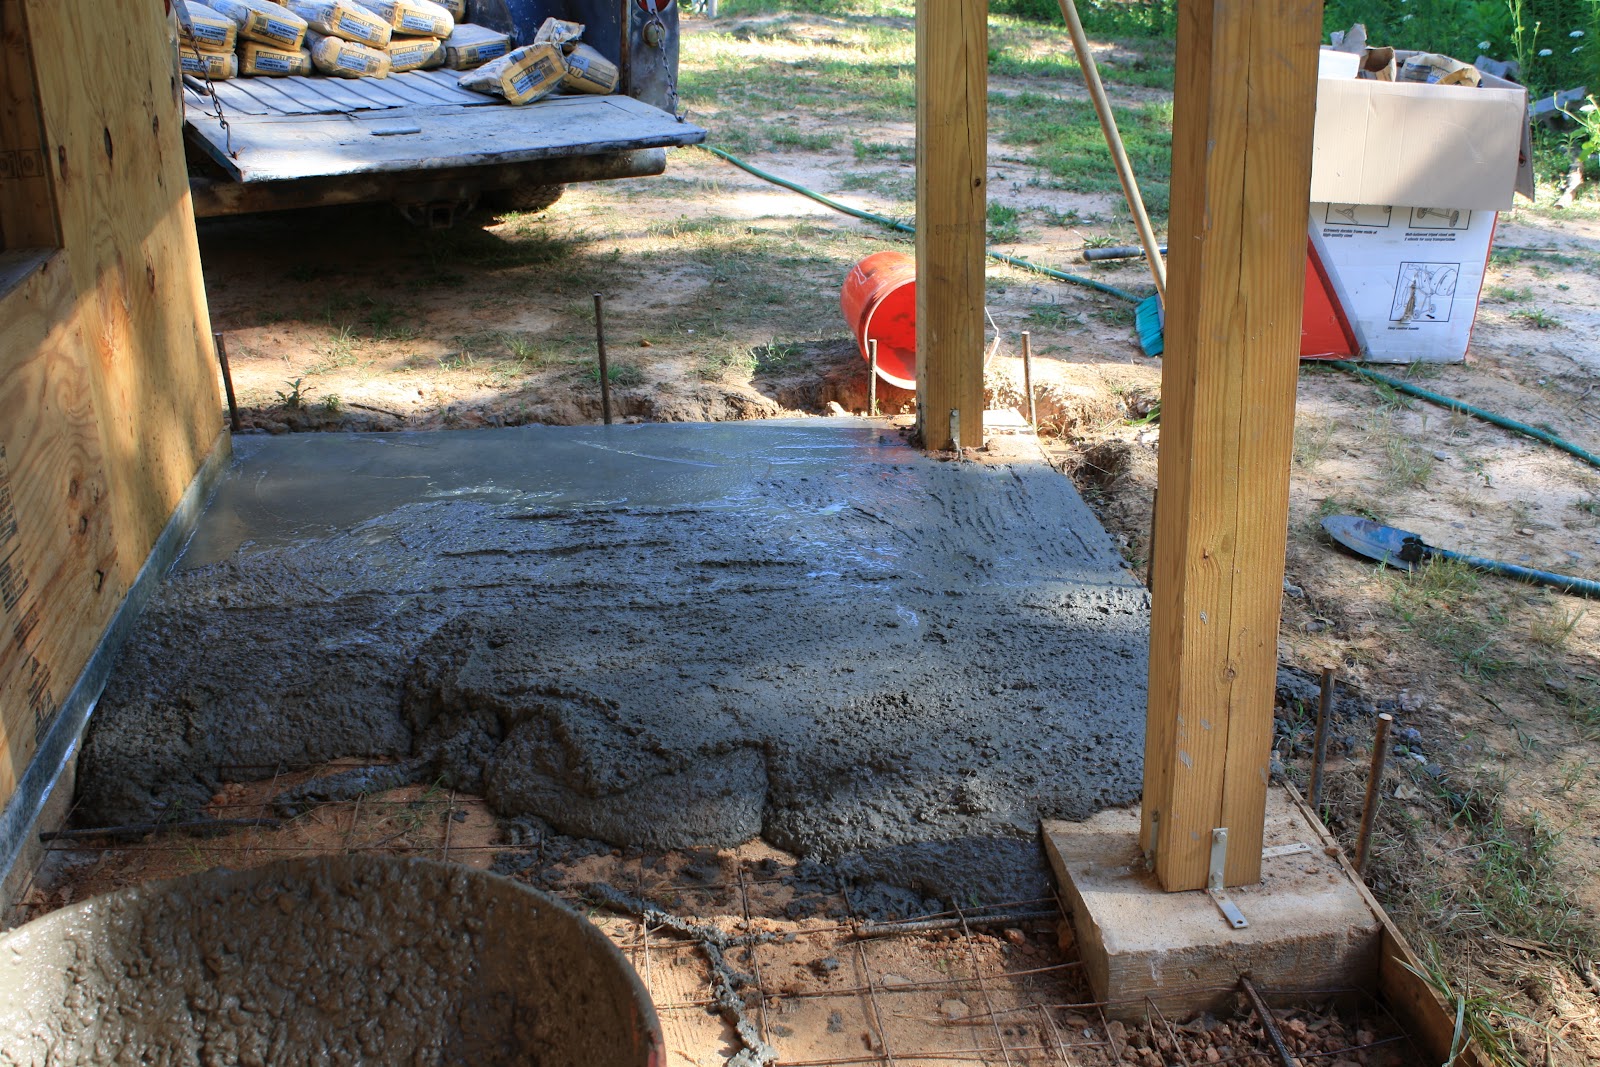
Once I had finished pouring each section I let it set for a few hours. Once it had set I went back and did what is called a "broom finish". It is basically where you take a broom and lightly drag it across the section in one direction. It leaves a course finish on the concrete and helps keep it from being to slick. This is a different finish than the one on the floor inside the cabin.


After establishing some what of a process the other 2 sections were all just a matter of mixing and pouring them.


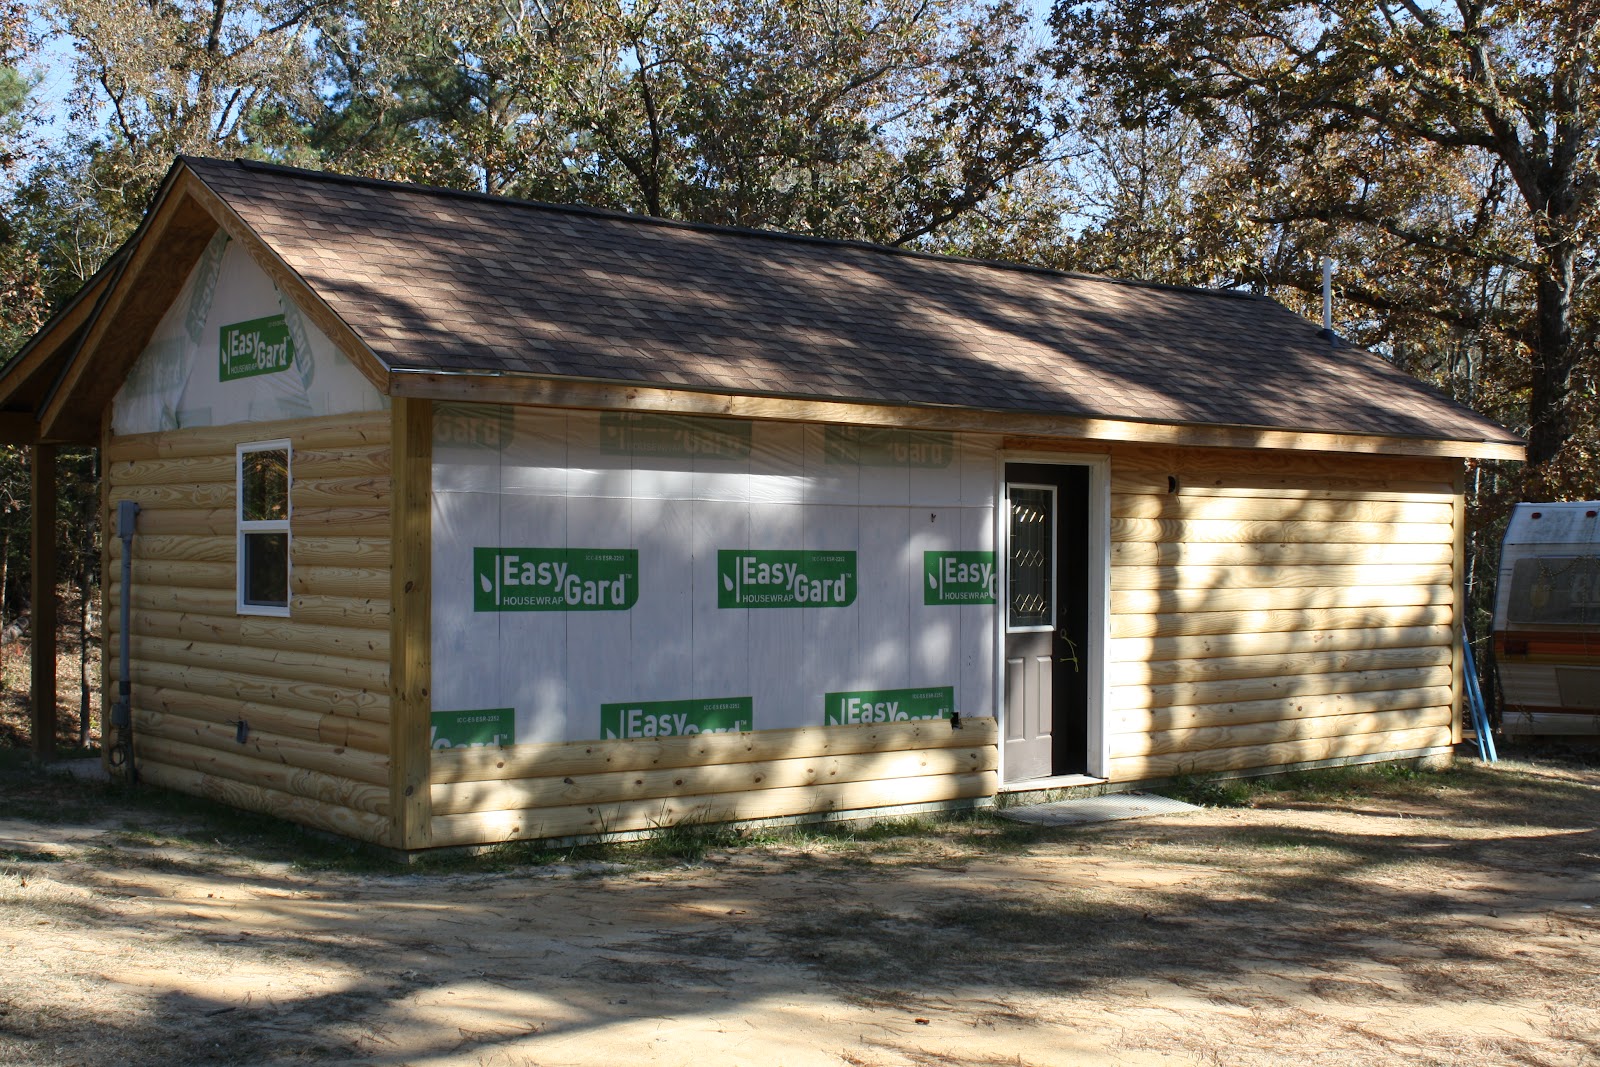
Now that the concrete for the porch is done I am going to install some of the windows and both of the doors. I will also need to put the house wrap on before I install the windows. The house wrap was pretty easy to install. You just wrap the cabin like a big present and staple the wrap as you go.


Once the house wrap was on I installed 3 of the windows and both of the doors. Now a little bit about the doors. I got them off of Craig's list. I guess the planets aligned because I got 2 really nice doors with the camming in the glass and they were very similar. I only paid $150 each for them and they sell at the local outlet store for nearly $1000 for both. So thank you Craig's list and the nice folks I got them from. This first one is the back door. It is a fiberglass entry door.


This is what we consider "the front door". It is a really nice door so we put it on the front porch side. As luck would have it, in the morning the sun trickles through it because the front porch faces due east. The camming in the glass refracts the light and it lights up the living room of the cabin with all kinds of pretty colors.


Due to the size of the cabin I am building it with four drawers underneath it. There are more than a few more pieces I plan to build along with the bed. I hope they all turn out as good as the bed has.


Now it is time to get started on the wiring. Being as the cabin is so small I thought it wouldn't take a whole lot of wire but it ended up taking almost 750 feet of 12/2 wire. I added some outside receptacles and some fans under the porch but I guess that not a lot of wire when you think about it. I installed a 40 circuit 30 space 200 amp square "D" breaker box. I realize I won't need that many circuits but it gives me room to expand it later if needed. There isn't a lot to take pictures of where the wiring is concerned.


I had also went ahead and trenched in the service line coming in from the power service. This was a job. The ground in my area is tightly compacted clay and it is HARD! It took me a whole day to dig the trench, run the wire in pipe and then cover it. I am glad that work is done.


With the slab for the water heater done now I need to run some of the siding. I am going to put the plumbing in a insulated raceway on the outside of the wall. I am doing this so any future plumbing work can be performed without having to tear out walls to fix any leak that may occur. Besides I am really looking forward to seeing how my choice of siding is going to look. I had to do a little prep work first. I went around the cabin and marked the location of all the studs in the walls so locating the screws in the siding would be easier. I wanted as many as possible to be in studs. The siding was pretty simple to do. Just start at the bottom and work you way to the top.


With the siding up that I need up I am going to run the water lines. Like I said I am putting it in a insulated raceway on the exterior wall. It was actually pretty easy to run. I used PVC on the cold and CPVC on the hot. It is all on just two walls and only took a couple of days to rough in. While I was at it I decided to build the aqua hut for the hot water also.


Now that I have the plumbing roughed in We decided to go ahead and do as much of the siding as we could afford. We are having to do the siding 320 linear feet at the time because of the cost. It cost $400 every 320 linear feet of siding so we do it in stages but that's fine because it is the look we wanted so it is worth it.


I decided that having most of the siding ran I would take a few pictures from off into the woods looking back towards the cabin. I absolutely love living out here and we are looking forward to getting the "Cedar Palace" finished and living in it. You will see soon why we call it the "Cedar Palace".


With the siding well under way we turned to getting the insulation installed. The thing with building something like this is there are inspections you have to have done and you must have one done at least every six months to keep your building permit current. There is no time limit on the construction that I know of but you do have to keep your permit current. The inspection of the insulation is one that is done of the insulation alone, meaning they come and look only at the insulation. It wasn't very hard installing the insulation but some people are allergic to it and will itch when handling it. It doesn't bother me so it went pretty easily. We used R-13 faced insulation in the walls and R-30 faced insulation in the ceiling.


The insulation inspection went very well. Now we can make it look like a house, it's time to do the sheet rock. For this part I called up some good friends of mine that do sheet rock for a living. These two guys are the best that I know of and have been friends for a long time. They figured the sheet rock up to be 42 sheets. 32 sheets of regular 4x12x1/2 sheet rock and 10 sheets of 4x8x1/2 mold, moisture and mildew resistant sheet rock. Add 5 buckets of sheet rock mud to that and lets see what it looks like. I didn't take any pictures during the process because we were moving to fast and to busy for such things but suffice it to say it only took one day to hang them and put the first coat of mud on them. My friend Dougie did all the mud work and he did an excellent job. He stayed with us for 2 days getting it right and when he was done the amount of sanding I had to do was minimal. The blue sheets of sheet rock are the moisture and mold resistant ones. We decided to put those along the wall behind the sink and stove as well as doing the entire bathroom with them.


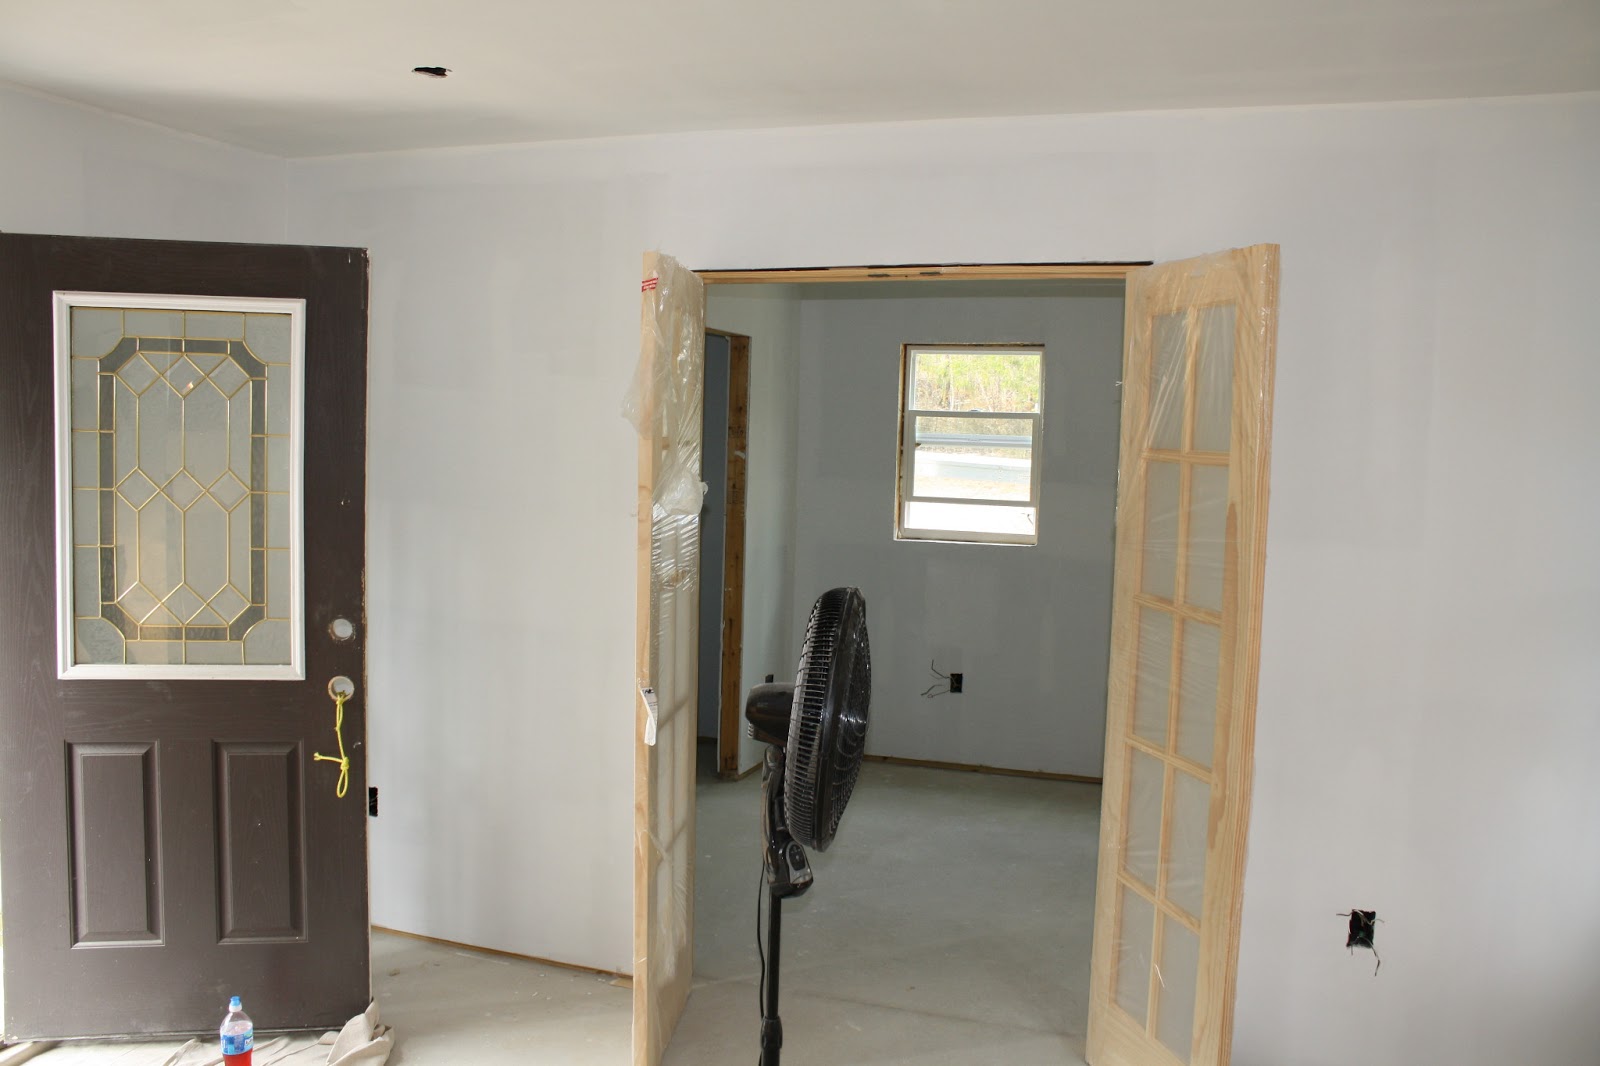
With the sheet rock done I decided to do a couple of the other interior projects that needed to be done. The first one was to hang the bedroom door. We had already bought it. We got it on close out for a great price and it was just the one we wanted. It fit the look we were after perfectly. It is a double French door with the 10 panel glass on both sides. I will not be painting it only polyurethaning it.


The second inside project was I needed to form and pour the curb in the shower. It is what will keep the water from the shower from running out into the rest of the bathroom. To do this I first needed to drill into the concrete slab and install four pieces of 1/2 re-bar. These are necessary to keep the curb from detaching from the floor in the future. They give the curb a solid connection to the existing slab. Next I built the forms for the curb and installed them so that the curb when finished would be 4 1/2" wide by 4 1/2" tall. I also cut and installed concrete wire in the curb so that it wouldn't crack and crumble apart later down the road. Lastly just as added protection against crumbling I decided that since it was only going to take two bags of cement to pour the curb I bought the high grade fiber reinforced concrete. Hopefully all of these precautions will make for a worry free curb for our shower.


With the door and the curb done for now it is time to do the thing I dislike the most. I do not know why but I hate to paint. No real rational for it I just hate to paint. So, being as it is a necessary evil may as well get it done. We had decided to keep the color simple. We decided that being as the cabin was small it would be best to paint the inside white so that it would appear to be larger than it actually is. First we rolled on a coat of primer on the ceiling and walls and then just a flat white paint. Nothing fancy because we may decide to do something different later so no need to spend more than necessary.


Now that I have the painting out off the way I am going to move to the cabinetry. I am going to just frame it up for now. There are many different ways to build them and all work great. I am going to rip down 2x4's and use them to frame the cabinets. This is one of the more simpler ways of doing them. I know that you can spend a small fortune on cabinets but there is no need for spending thousands of dollars on something I can build for a couple of hundred. I don't really have any set design for them I am just going to start in a corner and see where it goes from there.


With the cabinets started it may seem as though I am being a bit erratic in my construction but now I want to install some of the electrical fixtures. I have a couple of ceiling fans and some lights to install so I went ahead and got those installed. Actually I installed them before I started the cabinets but I wanted to show them to you so here they are.


Right about now is where I am supposed to tell you about this grand plan to do the floor and how wonderful it is going to look. Well I wish I could tell you those things but I can't. What I am going to tell you is that we had what we thought was a great idea for the floor that went oh so wrong when we got to the very last step.
Here's what happened. We decided that being as it was concrete we would epoxy the floor, we needed to seal it anyway so we could do a color and seal kind of thing and be done with it. Well sounded good. We researched it and decided that instead of just doing the garage style epoxy on the floor we would do what is known as "Etch & Stain". That is where you use an etcher that has chemicals in it that stains the floor as it etches. Once you clean off the etcher you then just clear coat it and you're done. There are several color choices and we chose one that was named "Coffee" it looked nice so we bought two of them and had at it.First I cleaned the paint and sheet rock mud off of the floor and then applied the etcher with a sprayer.


Now at this point I'm thinking "Oh Lord that is way to dark" But to late to turn back now. I let the etcher sit until it dried per the instructions and then neutralized it with water and baking soda and then vacuumed it up and hoped for the best. Once it dried again I was glad that it had lightened up some. The idea behind all of this is to try and give the concrete a "marbled" look. It worked OK and so we decided to go ahead and clear coat it and move on to something else.


The trim work is going to be made from cedar. All the windows and doors will be trimmed with it as well as the baseboard being made of it. I am going to have to make and hand sand every piece. Sounds like a lot but it's not. The baseboard is all the same width and the trim is another. SO, I just ran all the baseboard and then ran the trim that way I only had to adjust my table saw once.


Running the trim and baseboard was a little time consuming but it was well worth the effort.


Now that I have the trim and the baseboard well on its way I turned to building the rest of the cabinets. This is the part I have actually been looking forward to. I have already built the frames for them and now I will cover them with the plywood and build the doors and trim them. We are using 1/4" hardwood plywood to cover them and then I will rip some cedar down into strips and trim them with that.


With the "skin" on the cabinets I started running the trim on them. It is made from cedar that I had cut into boards that are 1 1/2" thick and 6" wide. I just ripped 1/4" strips from it and used that as trim. You have to be careful nailing the trim on. Use the right size finish nails for the job. If the nails are to big it will split the trim piece and you will have to make another one and that is easier said than done. Each one has to be ripped, hand sanded then mitered and then nailed into place.


If you notice, I added a small "bridge" above the window between the two cabinet sections. I did that to connect the two sections of cabinet and give them a more fluid look and to hide the light above the window.

I trimmed the bottom cabinets in the same way. Now everything is starting to take on the look I was waiting for.


With the cabinets trimmed it is time to make a BIG decision. What do I want to do the counter tops like? I went through the whole, granite verses marble versus Corian or laminate decision and decided, anyone can have those. Why not cedar, I have enough 1 1/2" boards to do it, So. Do it I did. I started out by doing the small sections around the sink. I had an old double bowl stainless sink I could lay into the sink position temporarily so as to make sure it all fit right. I then VERY CAREFULLY measured and cut the rest of the counter top pieces. I had to make sure to get them right the first time. If I messed just one of them up I would have to do them with another material because I only had enough cedar boards that thick to do it once. NO MISTAKES. Once I had laid the first piece I knew that this was the way to do them!

I used my 36" clamps to hold the pieces in place and I also used construction adhesive between each piece to hold them together. I also used 2 1/2" screws ran in from the bottom side through the cabinet frame to hold it all down. I ran them in from below so there would be no screws visible in the counter top.


Once I had all four pieces in place I went back and rounded the outer corners of the cabinet top and re-sanded it all. I really like how it all turned out.


Note : Sorry for taking such a long break in keeping this blog updated. A lot has happened since I last posted to it and I apologize for the delay. I think you are going to like how it all came out so , here's the rest of the story.......
With the counter top done it was time to work on the doors and drawers and getting all of those fitted up. I began by buying some shelving board and building the three drawers and putting the fronts on them. It was basically like building a box and putting it on tracks so it would open and close smoothly.

I knew I would be on the cabinets for a while so as I went I also ran any trim or other stuff as I went. The cabinet doors presented me with some what of a dilemma. Being as my cedar boards were not going to be wide enough to make a door for the cabinets, how was I going to make them? Well here's what I did. I bought a couple of sheets of lueon which is basically 1/4 thick smooth plywood. I then determined how tall and wide I needed each door and then cut a piece of the lueon to that size. Then I chose the cedar boards I wanted for the door I was building at the time , cut them to size and then put construction adhesive on the back of the cedar boards and placed the leuon on them and as a added measure I ran short screws in through the back side to hold it all in place as the adhesive set. Once it was all set and ready to hang I sanded it and trimmed it as necessary and hung it. Ta-DA ! LOL . I used this same technique to build some of the cedar bed. More on that later.


It took a few days to build and hang all the doors but once I was finished with them I knew I was going to like the finished product.


Once I had all the doors made and hung to make sure they fit right, I took them all down and started to finishing them. This is one of the things I was looking forward to. I had this picture in my mind of how I hoped it all would turn out and boy did it live up to my expectations. It took a couple of days to apply the 3 coats of polyurethane that I put on them, mainly because I had to let them completely dry before adding the next coat and before adding the last coat I used steel wool to rough up the finish. This seems to make that final coat shine just a bit more. Then once dry I had to rehang and adjust them all. While I was at it I went ahead and finished all the trim and counter tops. I couldn't help but stand back and admire them when it was all finished and ready for the sink.


Since money was still a little tight I decided to keep working with my cedar since I already had it and it was plenty dry enough to work with. I turned to working on our cedar bed and the inside of the closet.
I went ahead and finished the parts of the bed I made and assembled it in the bed room. Since it was a queen size bed and the cabin was pretty much built around it I just did all my work on it where it sat, in the bedroom.


Working on the inside of the closet was pretty simple. We wanted a nice shelf with a rod the entire width of the closet so I put a stainless cloths rod in under the cedar shelf.. I didn't put any finish on any of the cedar in the closet so we would get the full benefit of the cedar in with our cloths.


With a lot of my cedar work well on it's way to being finished we decide to deal with the floors again. We had already sealed them when we attempted to finish them before and so we decided to go ahead and cover them with the flooring we chose.We looked at a lot of ways of doing this and we had even considered in the beginning to use all the cedar we had to do the floor. Looking back we are so glad we didn't do that. Instead we bought a product from Home Depot called Traffic Master Allure vinyl plank flooring in the design called "African Wood". We were amazed how closely this matched the look of the cedar so that's what it would be. Now ordinarily it would be easy to lay stuff like this but I guess we're not ordinary and besides why make it easy on myself ? Most would just lay it in straight either from side to side or from end to end but nope not us. We decide that to lay the entire cabin as one continuous flow on the diagonal. That's right, start in one corner cutting it on a 45 degree angle and continue that pattern all the way through the cabin. So I started in one corner of the living area and worked towards the kitchen and bathroom.

When I got to the bathroom and through it's door in order to continue along the same pattern I had to work backwards more or less which made it a little harder to lay but with time and patience it worked out pretty good.


I also had to do the kitchen area the same way. The small area made it a little hard to lay the flooring but once I made my way out into the open floor of the rest of the cabin it wasn't to hard to make good time with it.


By the time I made it to the bedroom I was ready to get off my knees. I had to disassemble the bed a little bit to be able to move it around as I put the flooring down but it wasn't to bad. It gave me a chance to stand up so I didn't mind. Once it all was finished we were very pleased with the results. The over all cost was around $800. A little more than we wanted to spend but it's OK. The end result was worth it.


By now we were more than ready to move in but there were still a few things we need to do. I had already started on another piece we were going to need so I decided to go ahead and finish the corner cabinet I was building for the living are. It was being designed to hold all the entertainment equipment. Since we didn't have cable of satellite t.v. everything we watched was online so it all had to hooked to a computer. When I wired the cabin I made sure to pull a dedicated circuit just for the entertainment stuff. If you notice there is a gang receptacle with 8 plugins in the corner and the cabinet has a cut out in it so we can access the receptacles.


After the entertainment center I turned to the bed. I wanted to go ahead and finish it so when we moved in we could sleep on it. I still needed to build the 4 drawers that go in it and the support skeleton for them and the mattress. When your house is 420 sqft storage comes at a premium so the drawers were a must.
I built the drawers out of shelving board and plywood. Just a basic box with a bottom. I attached glides to the side of the drawers so the would be easier to open and close because they were 24"x 24" which is pretty big for a drawer. After the drawers I started building the skeleton inside the bed. This would support the drawers and mattress and had to be built from the bottom up.


Once the drawers were in place I installed the rest of the support for the mattress and covered it all with plywood for added support.


Then I attached the cedar face boards to the drawers. I had chosen some of the prettiest boards I had because I wanted the bed to be really nice and look good.


Now before I show how it all looked I want to go ahead and show you the last piece needed that will allow us to move into our cabin. In order to occupy a new home where we are there must be heat, all power fixtures terminated, water, a kitchen sink, a toilet and a bathroom sink. Now it was time to install the toilet and bathroom sink The toilet is just a standard toilet and the I built the bathroom sink cabinet like the kitchen ones and added 3 drawers to it. I had found the vanity sink some months prior to this at Lowe's. Someone had bought it but returned it because it was to small for their application. It was originally $150 but they let me have it for $17, and it matched the tile in our shower so YAY, I bought it.


With everything necessary finished, I called the county inspector. It had been almost 2 years to the day since we got the building permit to build the cabin. A whole lot of love , blood, sweat and even a dislocated shoulder had gone into the construction of it. We had paid for it as we built it so everything was paid for and now was the moment of truth. The inspector and I knew each other by now so when he came out we had a pleasant chat while he went about his job. He checked everything and when he finished he passed it all. The picture below is what we spent 2 years working for. Although there were a few things we still wanted to do, we could now move in.

It is now September 1, 2015 and we have been living in Our "Cedar Palace" for just over 2 years and we love it. It is one of the best decisions we have ever made. The simple act of turning into the drive leading up to the cabin changes our attitudes. We have continued to do other projects at our place just as we did this, a little at a time as we can afford them and you'd be surprised how much progress you can make, as they say, slow and steady wins the day but I will cover those in another post. Until then enjoy the pictures of the finished and lived in "Cedar Palace". Feel free to comment or ask any questions and I thank you for being paitent and reading about our place.


